
Hide
--- TEST SYSTEM --- TEST SYSTEM --- TEST SYSTEM ---
Hide
Contributors' Quick Start Guide
hide
Hide
This brief guide is intended to provide newly-joined GENUKI contributors with a gentle introduction to editing GENUKI pages. For further details and guidance you should consult the GENUKI Contributors Technical Guide. Additionally, several videos are available to guide you through the steps required to correct broken links.
To Edit an Existing Page
- Open in your browser the page you wish to edit.
- Click Login and enter your details.
- A series of tabs will appear. Click on the Edit tab to display the page in Edit mode.
- Scroll down to the section to be edited. Edit the text as required. Formatting can be changed/added using the menu immediately above. Hover over each item to understand its action.
- For example, to add a link (or edit an existing one), highlight the appropriate text, click the Link icon, enter or paste the link into the dialogue that appears and click OK.
- Save your work by clicking the Save button near the top of the page.
- A confirmation message will be displayed. Your page will then be displayed as it will be seen by Users.
- Log out.
It is really as simple as that. When you have got the hang of this, you can develop your skills further with the full GENUKI Contributors Technical Guide.
To add an Image to a Page
These instructions assume that you already have a suitable image prepared and saved in a convenient place on your computer.
- Open in your browser the page you wish to edit, login and click the edit tab, as described above.
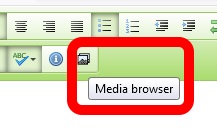
- Place your cursor at the place you wish to insert your image and click the Media Browser icon
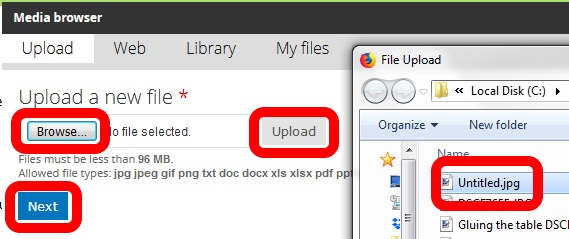
- Click Browse, navigate to where you saved your image file, click Upload and Next.
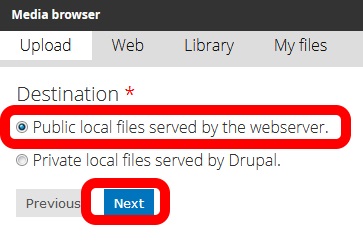
- Ensure that the Public local files... option is selected and the click Next.
- Scroll down and click Save and then Submit. Your image will appear. If you wish to centre it, click the Centre icon. You can adjust the size by dragging one of the black square "handles". Hold the Shift key down at the same time to maintain its proportions.

To Find and Fix Broken Links
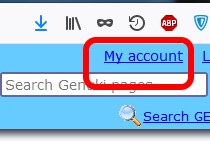
- Log in to Genuki, as above, and click My Account, to display a page of statistics about the counties and perhaps other pages you are responsible for (called Nodes in Drupal-speak).
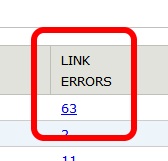
- Scroll down to the Current Errors section. In the Link Errors column, click on the first number, to display a list of all broken links for that county (node).
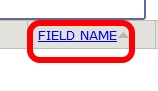
- Click on Field Name to sort the list in order of the page sections, to make things more convenient later.
- First fix the easy ones. Some will be shown as Moved Permanently or Found, in the Error column. The Broken Link column will show the broken link and the suggested correct link. If you are happy to make the suggested change, click the tick box. Repeat for all other such broken links.

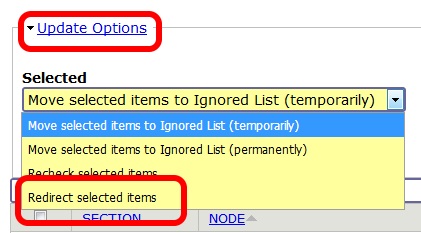
- When you have ticked all those to be corrected then, at the top left of the screen, click Update Options and Redirect Selected Items, and then Update. Wait while the links are redirected.
- For those shown as Not Found in the Error column, right click on the Broken Link, click Open Link in New Tab, and check that the link really is broken. If it seems OK, ignore it since it may be a short term error. If truly broken, attempt to find the the correct link. To correct the broken link, right-click on the link in the Node column, click Open Link in New Tab, scroll down to the section given in the Field Name column (Maps in this example) and edit the link, as described above.

- Errors in the Church Database are identified as Churches in the Field Name column and can be edited as for any other page.

- Repeat for any other counties (nodes) you are responsible for.
Five things you can do to practice your editing skills:
- Find and include a link
-find a link to the National Archives and include it in your page - Add something to an empty section
- select a currently empty section of a town/parish page and provide some text or other content for it - Add a table
- insert an empty table, 4 columns wide by 4 columns tall - Format a table
- populate your table, three columns of text and one of numbers
- italicize two columns of text
- centre the columns of italicized text
- right-justify the column of numbers
- make the top (header) row bold
- resolve any format conflicts - Include an image
- include an image that is already loaded to the system
(e.g. AllSaintsWetheringsett.jpg - /files/eng/SFK/images/AllSaintsWetheringsett.jpg)
- resize and position the image